The next week of Smashby’s Tip of the Week is live, and it’s the final of my four week handstand push-up progression!
Although the video is a bit long, I cover a lot of information.
The first three weeks focused on my process for teaching athletes how to safely get upside down and support their own body weight. This final week moves through progressions I use to continue to build confidence in athletes, along with timelines for when I think the next step should be t
Here’s a snapshot summarizing my 4-week series:
Learn and progress through the steps to safely learn Wall Climbs/Wall Walks
Learn and progress through the steps to safely learn a Headstand
Learn and progress through the steps to safely learn a Handstand
Build strength and control through the use of Negatives
Learn and progress through steps to safely apply Kipping to Handstand Push-Ups
What did you think of this series? Did you find it helpful? If not for yourself, do you think it’s a good way to teach other athletes?
Let me know in the comments, and let’s talk about this. If it’s good, I would love to share it with others. If it sucks, help me improve my content so it can help others.
The third week of Smashby’s Tip of the Week is live, and we’re continuing on to week three of my four week handstand push-up progression!
Today we’ll discuss another safe dismount from the Wall Climb position and then go from transitioning from headstands into the safe way of becoming confident progressing into a handstand. I’m always very cautious teaching athletes how to get into this position from the standing position, so please follow along with my steps in order to build confidence first before trying to make it a more dynamic movement. Plant those hands first, then get faster.
Once you can accumulate 90-seconds to two minutes in that handstand position, then you’ll be ready for next week’s session where we’ll discuss strategies for building strength, and improving your kipping for handstand push-ups!
I hope you find this information beneficial.
If you do, please share it with someone else you think it could help!
The second week of Smashby’s Tip of the Week is live, and we’re continuing on to week two of my four week handstand push-up progression!
Today we’ll discuss longer holds in the Wall Climb position and then move into my favorite way of teaching headstands. I’ve always found that improving one’s comfort in a headstand leads to more stable handstand push-ups. By the end of the four week series, we’ll be discussing kipping options and accessory work to improve being inverted.
I hope you find this information beneficial.
If you do, please share it with someone else you think it could help!
CrossFit athletes are often required to perform fairly advanced exercises and high repetitions of movements during their training. By simply improving one’s technique, it can lead to movement patterns that are safer, faster, and more efficient. I’ve heard a lot of different cues as a trainer and athlete, and sometimes it just takes a slightly different way of explaining the same thing for something to click. My goal with the “Smashby’s Tip of the Week” series is to offer my own two cents on ways to move better, and provide a new cue that helps some of you!
Since the thought of going upside down can be scary for a lot of people, handstand push-ups are one of the most intimidating movements for athletes. When I teach them, I tend to follow a fairly basic progression:
Can the athlete support their own body weight with their arms?
If no, there are a number of exercises and modifications I prescribe (which I can explain in more detail if my readers are interested) to get to that point.
If yes, how can we build strength and confidence in that inverted position?
Once they’re confident upside down, the work can begin to teach the actual handstand push-up.
Today’s video will focus on my preferred method of getting upside down safely, and increase stability in that position. In my next video I’ll talk more about proper positioning (such as being in a hollow body, active shoulders, etc), but for today we’ll just talk about how to get inverted!
I hope you find this information beneficial.
If you do, please share it with someone else you think it could help!
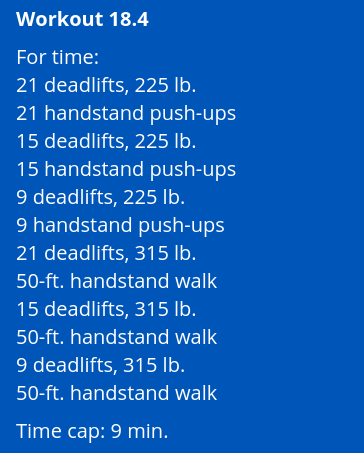
Some people prefer heavy barbells in workouts and others prefer more gymnastics style movements. Workout 18.4 has BOTH of those things!
Men’s Rx Workout
Women’s Rx Workout
The workout begins with the CrossFit Benchmark “Diane,” which is 21-15-9 of deadlifts (225/155) and handstand push-ups. Then, it gets turned up to “11” and the deadlifts go to 315/205, while the handstand push-ups turn into handstand walks (50 feet each round).
The main thing to note, is that since there is a tie break after EACH set of deadlifts, athletes should have a clue about where they hope to end, and base the entire workout on getting there as quickly and safely as possible.
Deadlifts
A 225lb. deadlift isn’t that heavy for a lot of male athletes, and a 155lb deadlift isn’t that heavy for a lot of women, but Diane isn’t the primary focus of this workout. Going unbroken because “you can” is not a good idea. Please be sure to keep your chest up and pace yourself during these reps. The handstand push-ups will take a lot longer than usual for most people, so utilizing an alternating grip and trying to relax your arms as much as you can while keeping the bar close will save your shoulders a bit.
I’d recommend most athletes break up the deadlifts into at least 3 sets with short rests for the first half of the workout. If and when you make it to the second half, it’ll need to be a judgement call for how to go about the heavier deads. If you can safely brace and go through quick singles, that might make more sense than trying to hang on for larger sets, but needing to take longer rests.
Handstand Push-Ups
Souls are going to get crushed here today. Assuming judging is done properly, thousands of athletes are going to no-repped for not hitting the movement standards. I recommend having someone video a few of your reps before the workout starts. Play around with staying locked out on the wall and flexing and extending your ankles, seeing how that places your feet in relation to the line, and making sure you know what a “good rep” feels like. Once you get tired, it’s going to be a lot more challenging to get all the way up and over. It’ll almost be a “scap push-up” at the top of the rep for most athletes.
When considering pacing, the only thing athletes should be thinking about is not to burn out.For “regular” Diane, people will often get through the round of 21 in only a few sets, struggle through the round of 15, and then completely crash and burn on that final round of 9 reps. Take that feeling and multiply it by 100 for the feeling most people will likely have here. Small sets, listen to your judge to minimize no-reps, and don’t get frustrated! It’s better to take long rests between good attempts, than to keep getting no-repped over and over again.
Handstand Walks
If you make it to this part of the workout, congrats! That’s going to be a huge accomplishment for this workout. Shoulders will likely be pretty tired, so as long as the main focus is keeping your arms straight, locked out, and strong, athletes with handstand walks should at least be able to make the 5ft increments without too much difficulty. I don’t think it’s necessary to do all 25ft in a row if the likelihood of falling is high. Walk a bit, drop if you need to, shake out those arms, and get back up.
Scaled Version
The weight is lighter (135/95 for the first part, and 185/135 for the second) and the movements are less advanced. But that does not mean the workout is easy! Hand-release push-ups are the second movement in the first half, and bear crawls were introduced in the Open for the second part.
The name of the game for the Scaled version is to just keep moving! On the set of 21 deadlifts, quick sets of 7 should work for a lot of athletes. Remember, just because you can go unbroken on the set of 21, doesn’t mean you should. The weight gets quite a bit heavier for the second time through and you don’t want to blow up your lower back!
The short rest on the ground for hand-release push-ups should allow athletes to keep moving a little faster through those reps. Since the bear crawls will be less stress on the shoulders for the second half of the workout, I would recommend pushing a little bit faster than you might want to on the hand-release reps.
While only a few athletes will likely finish the Rx’d version of this workout, there will be a lot more who make it through the Scaled version. That means instead of viewing this as a “get as far as you can” workout, you should approach it with a “what’s the best way to pace this entire workout” mentality. Smaller sets, short rest, will be the way to control heart rate and relieve your lower back from being under tension for too long.
Just remember that this is supposed to be fun! Put a smile on your face, keep your core tight and chest up, and get after it. Only one more week to go!
Well, today was day 2 of FREE CROSSFIT WEEK at CrossFit Lakewood, and it went even better than yesterday!! This evening there were 25 people in class… EIGHTEEN of which were non-members! Eighteen Newbies!!!
What does that look like? Well, throw in a beautiful day in terms of weather, a few warm-up exercises, and a lot of smiles… and it looks like this!
And then Ben S. leading 25 people through some Jumping Squats. I’d say he’s a natural leader!
The workout for today was a good one. It included quite a few shorter runs, kettlebell swings and either regular or handstand push-ups (depending on the athlete’s ability level). Here’s the crew all taking off at once for the first run lap! (thanks for not trampling me, Lion King style!…… too soon?)
Workout of the Day:
5 Rounds for Time
200m Run / 20 Kettlebell Swings / 200m Run / 20 Push-Ups (or 10 Handstand Push-Ups)
It was so cool to look around and see so many people swinging KB’s and doing push-ups. The sense of community and support you guys showed, and around people you had just met, was awesome!
For so many of you being “First-Time CrossFitters”, the form and technique work was AWESOME! Look at all of those full lock-outs at the top of the push-up!
Also, I’m proud to report that no one was hit with a rogue or flying kettlebell! That means the crew was organizing and respectful of the space around them. I mean, does it get ANY better than this? I’m not sure how, but I’m hoping to see if it does.
Now, to end the post with an feat of awesomeness, our very own Greg Walker (who has been featured on this blog quite a bit for just being cool) shows the world what it’s like to be good at Handstand Push-Ups. At the end of an almost 20-minute workout, the guy ends it with 10 unbroken HSPU’s! Pretty epic stuff… Well done, GW!